Bootstrap은 웹사이트를 쉽게 만들 수 있도록 도와주는 css, js 프레임워크 입니다. 복잡하지 않는 커스텀 디자인된 사이트가 아닌 일반 사이트에서는 많이 Bootstap을 사용하여 사이트를 제작하는데요. 이 글에서는 Bootstrap을 워드프레스에 적용하여 사용하는 방법을 안내하겠습니다.
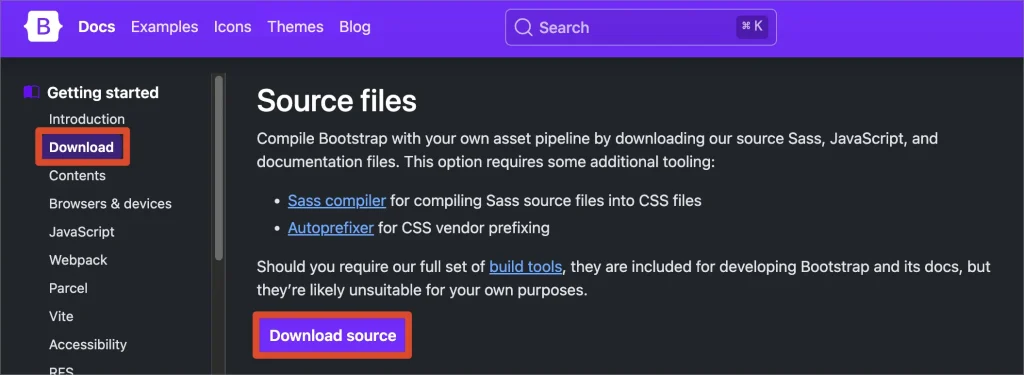
여기에서 Bootstrap Source file을 다운로드합니다. 압축을 해제하면 css와 js 폴더로 이루어져 있습니다.

테마 폴더(루트: wp-content > themes > 해당 테마) 안에 bootstrap 폴더를 생성하고 다운로드한 css, js 폴더를 업로드 합니다.
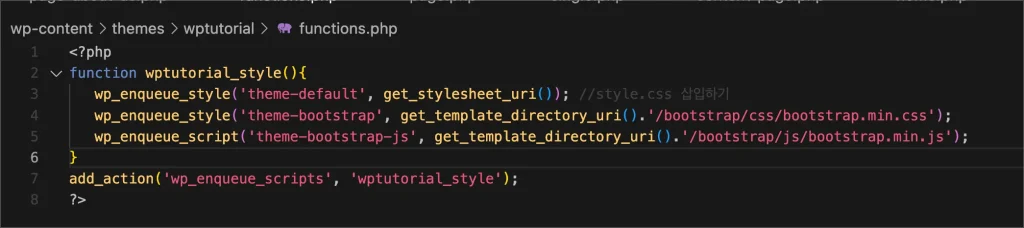
<?php
function wptutorial_style(){
   //style.css 삽입하기
   wp_enqueue_style('theme-default', get_stylesheet_uri());
   //bootstrap-css 삽입하기
   wp_enqueue_style('theme-bootstrap', get_template_directory_uri().'/bootstrap/css/bootstrap.min.css');
   //bootstrap-js 삽입하기
   wp_enqueue_script('theme-bootstrap-js', get_template_directory_uri().'/bootstrap/js/bootstrap.min.js');
}
add_action('wp_enqueue_scripts', 'wptutorial_style');
?>
워드프레스에서 style이나 script를 링크해주려면 functions.php 파일에 워드프레스용 코드를 삽입해야 합니다. style sheet를 링크해주기 위해서는 wp_enqueue_style 함수를, script는 wp_enqueue_script를 사용해야 합니다.

코드 입력 후 페이지 소스보기 화면에서 css와 js가 잘 들어갔는지 확인합니다.